
Why Upload Mechanics Matter for AP Submissions
You poured time into the perfect photo, chart, or scanned essay — but all that effort can be undone by a poor upload. Whether it’s an AP Research project, a digital art submission, or a scanned lab report, knowing the mechanics behind file types, file size, and color accuracy keeps your work consistent and professional from your screen to the grader’s. Think of this as the backstage technician’s guide: invisible when done right, catastrophic when ignored.

Who this guide is for
If you’re a student preparing AP work — especially AP Art and Design, AP Computer Science, AP Research, or any course that asks for digital artifacts — these are the real-world, no-nonsense tips that will save you time and stress. You’ll learn how to:
- Choose the right file format for the job.
- Control and reduce file size without destroying quality.
- Keep your colors true from screen to print.
- Prepare a reliable upload checklist so last-minute panics are history.
File Types — Pick the Right Tool for the Job
Not all file types are created equal. Choosing the wrong one can mean blurry images, unreadable text, or huge uploads that never finish. Below are common scenarios you’ll encounter and the formats that serve them best.
Images: When clarity and fidelity matter
For photos and scans, the three formats you’ll meet most often are JPEG, PNG, and TIFF. Each has pros and cons:
- JPEG (JPG): Compressed, small file size, widely accepted. Use for photographs where a tiny loss in fidelity is acceptable. Avoid repeated edits and re-saves — JPEG is lossy.
- PNG: Lossless for graphics and images with transparency. Great for screenshots, diagrams, and images with sharp text or solid-color areas. Produces bigger files than JPEG for photos.
- TIFF: High fidelity, lossless, often used when color accuracy and maximum detail are required (e.g., portfolio pieces). Files are large; use when the receiving system supports it.
Documents: Preserving layout and fonts
For essays, reports, and pages with strict layout needs:
- PDF is king. It preserves fonts, spacing, and embed images. Export to PDF from Word, Google Docs, or InDesign rather than printing-to-PDF when possible.
- When a text submission is specifically requested as DOCX or another editable format, follow instructions — but be aware the reviewer’s layout may change.
Audio and video: Balance quality and size
For oral presentations, multimedia projects, or video analyses:
- MP3 for audio — small, broadly compatible.
- MP4 (H.264) for video — strong compression with good visual fidelity and maximum compatibility with web players and LMS platforms.
File Size — Why Limits Exist and How to Meet Them
Platforms often set file size caps to protect storage and bandwidth. Even if a site accepts large files, uploading huge files increases the risk of failure and timeouts. Here’s how to keep sizes reasonable while protecting quality.
General sizing rules of thumb
- Photos for web/submission: aim for 1–5 MB each if at high quality.
- Scans of pages: 150–300 DPI for text. Keep below 2 MB per page when possible.
- Portfolio images for detailed art: save high-res TIFFs for offline archive and export optimized JPEGs for upload.
- Videos: target 10–100 MB for short clips (30–60 seconds) depending on resolution and motion. Use 720p when 1080p is unnecessary.
How to reduce file size without losing quality
Use the right combination of format, resolution, and compression:
- Downsample only when acceptable. For photos, reduce resolution to match the viewing size (don’t upload a 6000px-wide image if the grader only views it at 1200px).
- Use controlled compression: export JPEGs at 80–90% quality — often indistinguishable to the eye but much smaller.
- For PDFs, use “Save As Optimized PDF” or “Reduce File Size” features and embed only necessary fonts and images at reduced resolution.
- Trim video clips, lower bitrate, and use H.264 encoding. Tools like HandBrake (or the export presets inside Premiere or iMovie) help a lot.
Color Accuracy — Preserve Your Intent
Color accuracy matters most in art, photography, or any work where hue and tone carry meaning. Colors can shift between devices, so understanding color spaces and calibration is key.
Color spaces explained simply
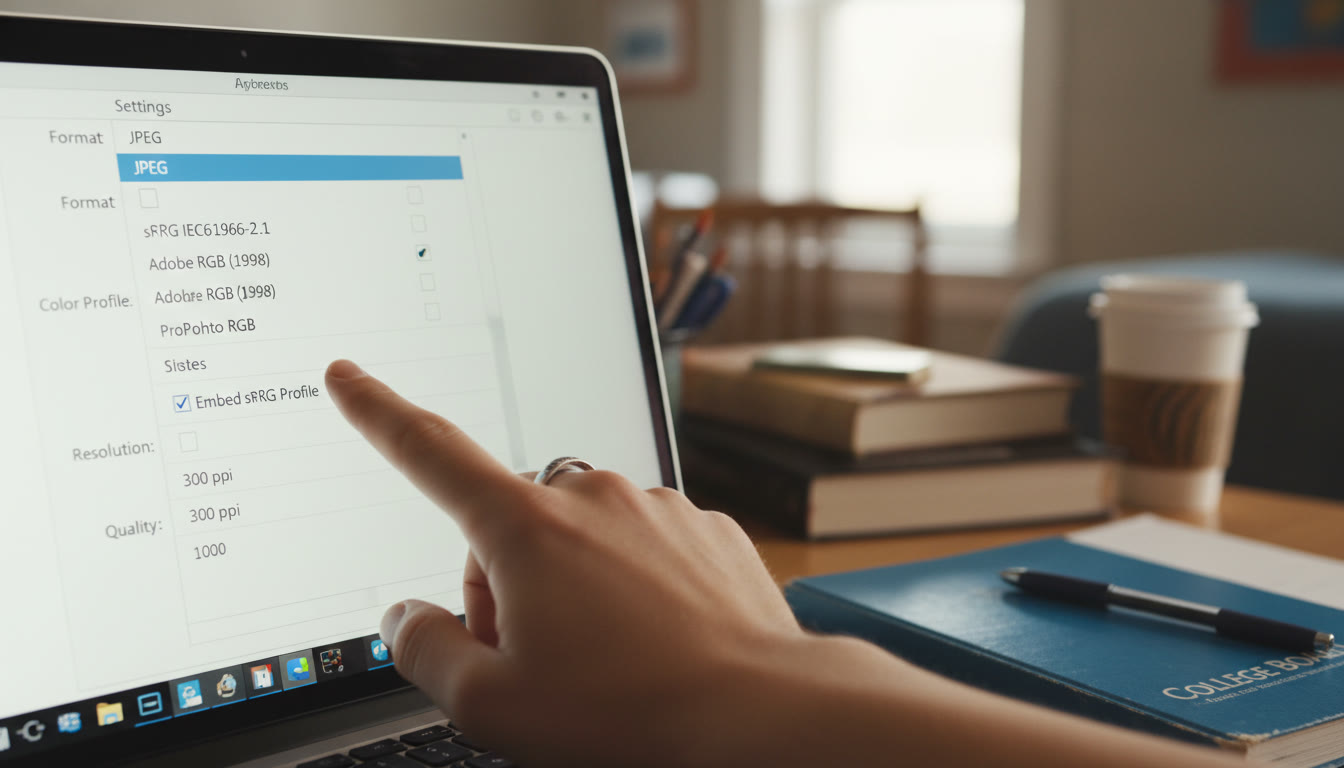
- sRGB — The universal web color space. Most online submissions expect sRGB; it’s safe for screen viewing.
- Adobe RGB — Wider gamut (more colors) used by professional printers and high-end workflows. Don’t upload Adobe RGB images unless you know the grader can accept it — colors may look muted on standard screens.
- CMYK — For printing. Screens use RGB; printers use CMYK. Converting from RGB to CMYK can shift hues, so check proofs before final printing.
Practical steps to keep colors true
- Work in sRGB for submissions unless you’re explicitly told otherwise.
- Calibrate your monitor at least once a month with a cheap colorimeter — this reduces surprises between what you see and what others see.
- Embed the color profile when exporting files (many export dialogs let you “Embed sRGB Profile”). This tells the viewer how to interpret colors.
- Always preview your exported file on at least one other device (phone or a different laptop) to see how colors render in different environments.
Sample Reference Table: Formats, Best Uses, and Tips
| File Type | Best For | Pros | Cons | Quick Tip |
|---|---|---|---|---|
| JPEG | Photographs for web/submission | Small files, wide compatibility | Lossy compression; repeated saves degrades quality | Export at 80–90% quality; avoid multiple re-saves |
| PNG | Screenshots, diagrams, images with text or transparency | Lossless for sharp graphics; supports transparency | Larger than JPEG for photos | Use for clean-edged graphics and logos |
| TIFF | Archival photos, portfolio pieces | Lossless, high fidelity | Very large files; not always supported by upload systems | Keep a TIFF master; export a JPEG for submission |
| Essays, layouts, multi-page documents | Preserves layout; widely supported | Embedded images can bloat size | Optimize images inside the PDF before export | |
| MP4 (H.264) | Video presentations | Good balance of quality and size; widely compatible | High-res videos can still be large | Export with 2–4 Mbps for 720p; 8–12 Mbps for 1080p |
Workflow Examples: Real Student Scenarios
Concrete examples help you visualize the right choices. Here are three common scenarios and how to approach them.
1) AP Art and Design portfolio image
Goal: Submit a high-fidelity piece that keeps color and detail.
- Shoot or scan at high resolution (300–600 PPI for artwork).
- Work in a wide-gamut space for edits if you print later, but convert to sRGB for submission.
- Save a TIFF master, then export an optimized JPEG (maximum dimensions that the submission portal requires). Embed the sRGB profile.
- Keep a separate PDF of your portfolio pages if requested; compress images during PDF export to balance quality and size.
2) AP Research poster or infographic
Goal: Keep text crisp and ensure charts are legible.
- Create graphics in vector-friendly tools (Illustrator, PowerPoint, or Google Slides) so text scales cleanly.
- Export charts and graphics as PNG at the resolution they’ll be viewed.
- Compile into a PDF, embed fonts, and run a quick visual check at 100% zoom to ensure legibility.
3) Video presentation for AP Computer Science Principles
Goal: Submit a clear, watchable video with readable screen captures.
- Record at 720p or 1080p depending on length and platform limits.
- Use MP4/H.264 encoding. Keep bitrate appropriate to resolution to reduce stuttering during playback.
- Trim dead time and keep the final file under the portal’s limit — split into parts only if that’s allowed by instructions.
Common Pitfalls and How to Avoid Them
- Uploading the wrong color space: If you submit Adobe RGB and the grader views in sRGB, your colors may look flat. Convert to sRGB unless told otherwise.
- Huge uncompressed files: Don’t upload raw camera files or uncompressed video; they’ll either fail or time out.
- Embedded fonts missing: When exporting PDFs, embed fonts to avoid layout shifts.
- Relying on one device to proof files: Check on a phone and another laptop. What looks perfect on your monitor may not on someone else’s.
Upload Checklist — Your Pre-Submission Ritual
Turn this into a checklist you run through before hitting Upload. Print it, pin it on the wall, or keep it as a sticky note in your project folder.
- File Name: Clear, descriptive, and follows any naming convention the submission system requires.
- Format Check: Correct file type (JPEG, PNG, PDF, MP4, etc.).
- Color Space: Converted to sRGB (unless otherwise specified) and profile embedded.
- Resolution: Matches the reviewer’s expectations (e.g., 300 DPI for detail-based images, 150–300 DPI for text scans).
- File Size: Under portal limits. If not, optimize images or compress video appropriately.
- Fonts: Embedded in PDFs; avoid uncommon system fonts when using DOCX.
- Preview: Open the final exported file on multiple devices and scroll through at 100% zoom.
- Backup: Keep a TIFF or native source file and an archived copy of the final upload on external storage.
- Time Buffer: Upload early; server issues and last-minute edits are a reliable source of panic.
Tools That Make It Easier
You don’t need pro software to do this well — but knowing which tools help speeds everything up:
- Image editors: Photoshop, Affinity Photo, or free tools like GIMP for detailed color work.
- Document tools: Adobe Acrobat (or built-in PDF export in Word and Google Docs) for controlled PDFs.
- Video tools: HandBrake for compression, iMovie or Shotcut for basic trimming and export.
- Color calibration: Hardware tools (e.g., a small colorimeter) are affordable and worth the investment if color is critical.
How Sparkl’s Personalized Tutoring Helps
When technical hurdles distract you from the creative or analytical work, a little personalized support can make a big difference. Sparkl’s personalized tutoring offers 1-on-1 guidance that helps you decide file formats, develop tailored study plans for portfolio preparation, and get expert feedback on your digital submissions. Tutors can walk through export settings with you, help you optimize images and PDFs, and provide AI-driven insights so your files meet both aesthetic and technical expectations — freeing you to focus on the substance of your work.
Final Notes: Keep It Simple and Reproducible
At the end of the day, the best upload is one that reproduces your intent reliably. Build a small, repeatable workflow: create a master file (TIFF, raw video, or original editable document), export an optimized submission file (JPEG, PDF, MP4), preview across devices, and archive everything. This system saves you time, frustration, and the dreaded “file not accepted” message at 11:59 PM.
Quick Troubleshooting Cheat-Sheet
- Upload fails repeatedly: Try a different browser, clear cache, reduce file size, or use a wired connection.
- Colors look wrong after upload: Confirm sRGB, embed the profile, and preview in a different viewer.
- Text looks fuzzy: Export images containing text as PNG or embed text as vectors in PDFs.
- Video stalls during playback: Re-encode at a lower bitrate or split long videos into shorter parts if allowed.
Parting Advice — Make Good Habits Now
Technical skills around file preparation are underrated but incredibly useful — not just for AP submissions, but for college applications, internships, and any project where presentation matters. Spend time building a reliable process, learning a couple of export presets, and testing files before every major submission. Small habits — like naming conventions, master-file storage, and a two-device preview — shave hours off stress and improve the quality of what you share.
Need hands-on help?
If you want guided, practical assistance that walks you through preparing and exporting files step-by-step, Sparkl’s tutors can provide targeted sessions just for upload mechanics. Tutors can show you how to set up export presets, calibrate your display for color-accurate work, and create submission-ready files that meet every specification.
Now go on — export confidently, upload early, and let the technical details support the brilliance of your ideas.


No Comments
Leave a comment Cancel