Why Particulate Diagrams Matter on AP Chemistry
Particulate diagrams — tiny drawings that show particles, ions, molecules, and their arrangements — are more than cute sketches you doodle in the margin. On the AP Chemistry exam, they are a language. They let you translate chemical ideas into visual evidence that exam readers can grade quickly. When you draw the right thing in the right way, you’re not just answering a question: you’re communicating your understanding directly to the scorer.

The scoring mindset: what readers are looking for
AP scorers have a rubric, and that rubric is precise. They don’t have time to guess what you mean — they award points for specific, observable elements. That means your drawings must include the features the rubric asks for: correct particle types, correct relative positions, correct counts, correct charges or partial charges, evidence of interactions (like ionic attraction or hydrogen bonding), and sometimes appropriate notation (dots, brackets, or labels).
Think of your particulate diagram as an argument made in pictures. Each dot, each bracket is a premise. The scorer checks off whether the premises exist. If they do, you get credit. If they don’t, it’s a lost point — even if your written explanation is excellent. So the job is twofold: show the right things, and show them clearly.
Common question types that use particulate diagrams
AP Chemistry prompts often require particulate diagrams across several contexts. Familiarize yourself with these common prompts so you can practice the appropriate visual shorthand.
- Phase changes and molecular motion (solid, liquid, gas) — showing particle packing and movement.
- Solutions and solvation — showing solute ions/molecules separated and surrounded by solvent molecules.
- Reaction mechanisms at the particle level — illustrating collisions, orientation, and contact points.
- Precipitation and net ionic equations — showing spectator ions versus precipitated ions in a lattice.
- Intermolecular forces — indicating dipoles, hydrogen bonds, and dispersion interactions between particles.
A quick checklist for scorer-friendly particulate diagrams
- Correct identity: Are the particles labeled or differentiated (color, shape, letter)?
- Correct quantity: Does the diagram show the right ratio or count of species?
- Correct arrangement: Does spacing reflect the phase or interaction (tight for solids, spread for gases)?
- Correct interactions: Are attractions or repulsions (ionic bonds, hydrogen bonds) indicated where required?
- Neat labels: Use short labels (Na+, Cl-, H2O) or an in-diagram key to avoid ambiguity.
Drawing conventions that earn points (and save you time)
You don’t need to be an artist. Scorers aren’t grading your drawing skills — they’re grading your scientific clarity. Adopt a few consistent conventions and stick to them throughout the exam.
- Shapes: Use circles for atoms or molecules, small filled circles for electrons, and squares or distinct shapes for ions if you need clear differentiation.
- Labels: Use concise labels like Na+, Cl−, or H2O. If you use color in scratchwork, make sure you also label; color alone is not sufficient.
- Charges: Indicate charges with superscripts (+, −) next to the particle. If partial charges are needed, use δ+ and δ−.
- Interactions: Dotted lines or short dashed lines are perfect for hydrogen bonds; dashed double arrows can indicate resonance, but only if relevant.
- Spacing: Reflect phase—tight packing for solids, moderate for liquids, and widely spaced for gases.
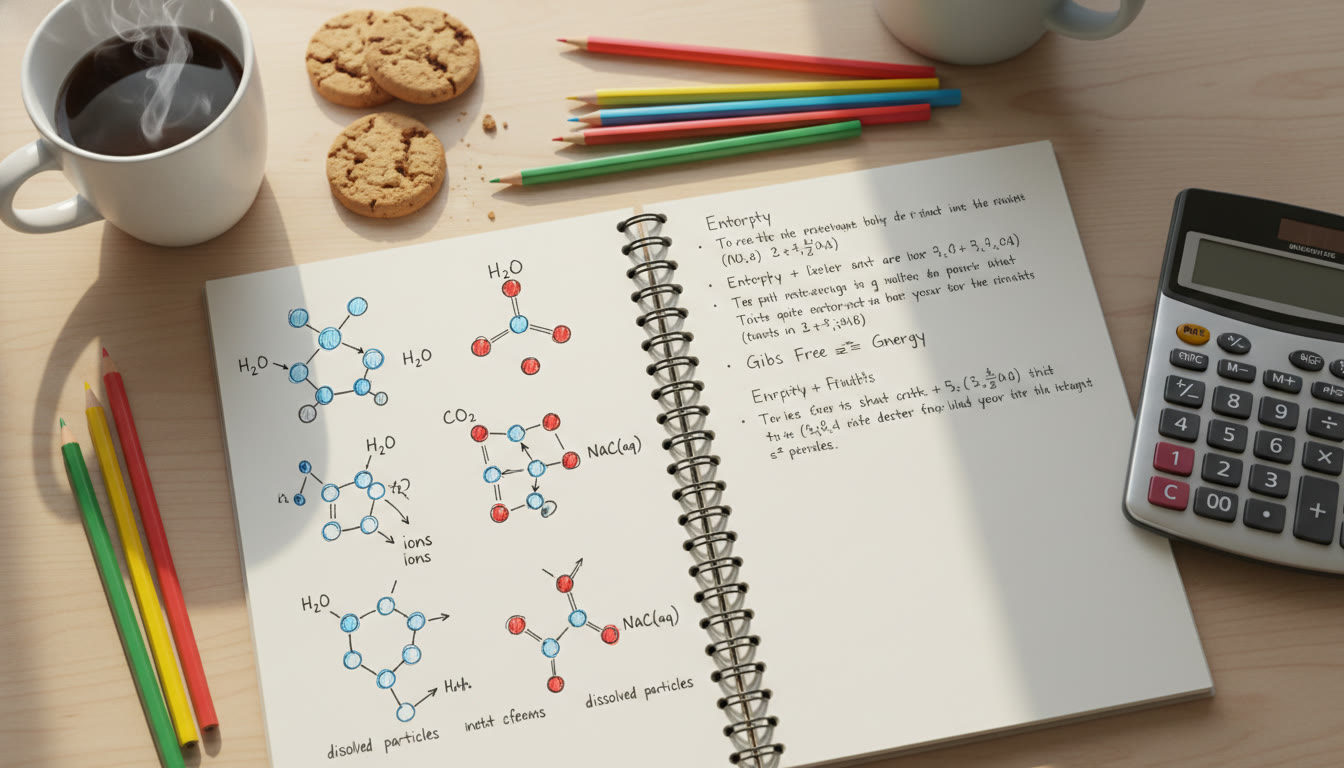
Example: Solvation of NaCl in water (what to show)
When asked to show NaCl dissolving in water, a scorer expects the following basic elements:
- Separated Na+ and Cl− ions, not NaCl molecules.
- Water molecules oriented with their oxygen toward Na+ and hydrogens toward Cl− (to show polarity).
- Labels for the ions and perhaps a key explaining which particle represents which species.
Sample answers: Diagrams with commentary
Below are three succinct sample diagrams described clearly so you can reproduce the scoring elements. When you practice, draw these cleanly and label everything the rubric could ask about.
Sample 1: Ionic dissolution (NaCl in water)
Sketch: Several Na+ and Cl− as separate circles. Around each Na+, draw 4 water molecules with the oxygen (O) closest to Na+. Around each Cl−, place water molecules with hydrogens (H) pointing toward the Cl−. Label Na+ and Cl− and indicate charge. Optional: small dotted lines showing ion–dipole attractions.
Sample 2: Phase comparison (solid vs. liquid AB)
Sketch: Left panel labeled “Solid”: tightly packed A and B particles with A–B pairs fixed in a lattice. Right panel labeled “Liquid”: same particles more separated and randomly arranged, some broken A–B contacts, more motion indicated by small directional arrows. Make sure the number of particles is conserved between panels if the prompt expects it.
Sample 3: Precipitation reaction (Ag+ + Cl− → AgCl(s))
Sketch: Before mixing — solution 1 has Ag+ and spectator ions, solution 2 has Cl− and spectator ions. After mixing — show Ag+ and Cl− particles paired into clusters (black dots representing AgCl solids) forming a lattice in the precipitate region, while spectator ions remain dispersed. Label spectator ions as such if the rubric requests them.
Table: Typical rubric elements and how to display them
| Rubric Element | What Scorer Expects to See | How to Draw It |
|---|---|---|
| Correct species identity | Particles correctly labeled or clearly distinct | Use letters or symbols: Na+, Cl−, H2O; include a 1–line key if needed |
| Correct particle count | Relative numbers or ratios accurate | Show consistent proportions across panels (e.g., 3 Na+ : 3 Cl−) |
| Phase representation | Spacing and arrangement appropriate to solid/liquid/gas | Tight lattice for solids; moderate density with random arrangement for liquids; sparse for gases |
| Intermolecular/ionic interactions | Evidence of attraction (dipole orientation, hydrogen bonds, ionic attraction) | Use arrows or dashed lines to show orientation or attraction |
| Spectator ions vs. reacting ions | Clear separation of participating ions and spectators | Label spectators and show them unchanged in all panels |
Words + Pictures: When to use a short caption
A tiny caption — one line — can transform an ambiguous sketch into a full answer. If a prompt asks for both a diagram and a justification, don’t rely on the diagram alone. Use a one-sentence caption to point out the exact thing the scorer should notice: “Water molecules orient with O toward Na+ (ion–dipole attraction)” or “Ionic lattice forms in precipitate region, spectator ions remain solvated.” This small bridge between picture and explanation often seals the point.
Example caption use
Examine an FRQ asking why CaCl2 dissolves in water but CaCO3 does not. Your particulate panels could show Ca2+ fully solvated by water with Cl− separated; for CaCO3, show a CaCO3 lattice with strong ionic/covalent network preventing solvation. Caption: “Calcium ions in CaCl2 are solvated by water (ion–dipole), overcome lattice energy; CaCO3 lattice remains intact due to higher lattice energy relative to solvation energy.” Keep it short; tie it to the energy argument in your explanation.
Common mistakes that cost easy points
Knowing what to avoid can be as valuable as knowing what to do. These recurring errors show up on student responses every year. Avoid them.
- Not labeling species or using ambiguous symbols. (Scorers can’t read your mind.)
- Showing bonded NaCl molecules in solution instead of separated ions.
- Incorrectly drawing hydrogen bonds as solid lines rather than dashed/dotted lines (which can confuse the interaction type).
- Changing the number of particles between panels when conservation is required by the prompt.
- Overcomplicating the diagram — extra detail that isn’t asked for can distract and sometimes contradict the rubric.
Practice strategy: Build scorer intuition through deliberate practice
Practice is not just repetition. Deliberate practice targets the specific scorer expectations above. Here’s a focused plan you can use for three weeks of steady improvement.
- Week 1 — Familiarize: Study rubrics and sample scored responses. Reproduce three scored particulate diagrams per day and annotate why points were awarded.
- Week 2 — Apply: Take past FRQs that ask for particulate diagrams. Time yourself and practice adding a concise caption for each diagram.
- Week 3 — Simulate: Do full FRQs under timed conditions, including both diagrams and explanations. Have a peer, teacher, or tutor give feedback focused on rubric elements.
How Sparkl’s personalized tutoring can accelerate your practice
If you want targeted feedback faster, personalized tutoring is a game-changer. One-on-one guidance can pinpoint recurring diagram mistakes, create a tailored study plan that addresses your weak spots, and give you AI-driven insights on where you lose points most often. Working with an expert tutor helps you implement rubric-first drawing habits efficiently and gain confidence in your visual explanations.
Scoring scenarios and how many points each element typically earns
While rubrics vary across questions, many AP Chemistry FRQs award points in a pattern: one point for identifying species, one for indicating interactions/arrangement, and another for labeling or captions. The table below gives a generalized view to guide your priorities while drawing.
| Point Type | What Earns the Point | Priority When Drawing |
|---|---|---|
| Identity | Correct particles shown and labeled | High |
| Arrangement/Phase | Spacing and arrangement consistent with phase or process | High |
| Interactions | Evidence of bonding, attraction, or repulsion (dashed lines, orientation) | High |
| Conservation | Particle counts preserved when required | Medium |
| Caption/Labeling | Short clarifying statement linking diagram to claim | High |
Time-saving drawing techniques for test day
Time is limited. Use efficient drawing habits that show exactly what the scorer needs without wasting precious minutes.
- Adopt a two-step approach: sketch lightly to place particles, then go back to add labels and key interactions. This prevents messy overwriting.
- Keep a personal shorthand for common particles (e.g., gray circle labeled “Na+” or a small square labeled “Ag+”). Practice it so it’s readable under pressure.
- Use a one-line key if multiple shapes/colors are used. Example: “Black circle = AgCl particle; open circle = spectator ion.”
- When asked for multiple panels, draw grid boxes first so panels align and the reader can compare elements at a glance.
Putting it together: A worked example from prompt to scorer-ready answer
Imagine a prompt: “Draw particulate diagrams that show what happens when aqueous solutions of Pb(NO3)2 and KI are mixed. Identify spectator ions and the precipitate. Explain your reasoning.” Here’s how to craft a scorer-ready response.
- Panel 1 (Before mixing): Show Pb2+ and NO3− in one container; K+ and I− in another. Label each species. Keep numbers realistic (e.g., 3 Pb2+ with 6 NO3−; 6 K+ with 6 I−), but don’t overcount.
- Panel 2 (After mixing): Show Pb2+ and I− clustering into AgCl-equivalent style solid particles (here PbI2) forming a precipitate lattice in a region. Show spectator ions K+ and NO3− still dispersed in solution.
- Caption: “Pb2+ and I− form an insoluble ionic lattice (PbI2), which precipitates; K+ and NO3− remain solvated (spectator ions).”
- Explanation: Briefly connect to solubility rules and lattice/solvation energy argument if the question requests it.
Practice prompts to try (with self-scoring hints)
Use these practice prompts to build confidence. After each diagram, check yourself against the rubric elements discussed above.
- Show particulate diagrams for HCl(aq) + NaOH(aq) → NaCl(aq) + H2O(l). Hint: show H+ combining with OH− to form H2O; Na+ and Cl− remain solvated.
- Draw particulate representations for CO2 dissolving in water to form carbonic acid (include partial charges and show hydration if asked).
- Compare particulate diagrams for CH4 and H2O at room temperature to explain why methane is a gas and water is a liquid.
How to get feedback that matters
Timed self-practice is useful, but targeted feedback accelerates improvement. If you can, ask a teacher or tutor to score one practice set per week focusing solely on your particulate diagrams. Sparkl’s personalized tutoring programs often include focused sessions on visual explanations, 1-on-1 feedback loops, and tailored study plans that zero in on recurring errors — which cuts your learning time considerably.
Final tips — clarity over cleverness
When you sit down for the AP Chemistry free-response section, remember these guiding principles:
- Simplify: A clear, simple drawing with the right elements beats a fancy sketch that’s ambiguous.
- Label: Always label species and any special symbols you use.
- Caption: One short sentence can secure a point by connecting picture to claim.
- Practice smart: Use focused practice sets and seek specific feedback on your diagrams.
- Conserve time: Use consistent shorthand and panel grids to speed up layout.

Closing: Drawing confidence one dot at a time
Particulate diagrams are one of the most approachable parts of AP Chemistry to master — you don’t need to memorize long lists, just a small set of conventions and the habit of showing exactly what the rubric asks for. Practice with intention, pair your drawings with short captions, and get feedback that focuses on rubric elements. If you want to speed up that feedback loop, consider personalized tutoring to receive tailored study plans, expert tutors, and AI-driven insights that pinpoint where your diagrams are losing points. Little changes in how you draw and label will add up to more points on exam day.
So: keep your pencils sharp, your labels clear, and your diagrams purposeful. The scorers are human, but they’re following a checklist — give them what they want, and you’ll see your scores reflect that clarity. Good luck, and happy diagramming!


No Comments
Leave a comment Cancel