Why Ergonomics Matters for AP Students
Long study sessions are part of the AP experience. Whether you’re cramming for AP Biology, practicing FRQs for AP English, or working through AP Calculus problem sets, your body is doing a lot of the heavy lifting—literally. When your desk, chair, and posture are misaligned, study time turns into fatigue, discomfort, and reduced concentration. Good ergonomics doesn’t just prevent aches; it improves focus, retention, and stamina.
The real cost of bad posture
Pain isn’t just a nuisance. Neck strain, low back pain, wrist discomfort, and headaches can interrupt study rhythms and force extra breaks that fragment your attention. For students preparing for high-stakes AP exams, those interruptions add up. The good news? Thoughtful adjustments to your desk and habits can produce quick, noticeable improvements.
Core Principles of Desk Ergonomics
Ergonomics is about fitting the environment to the person. Here are four core principles to guide a student-friendly setup:
- Neutral posture: joints stacked, not overextended—ears over shoulders, shoulders over hips, hips over knees.
- Support where it matters: lumbar support for the low back, cushioning for wrists, and a stable surface for the forearms.
- Minimize strain: place frequently used items within easy reach to avoid repetitive twisting or reaching.
- Movement and variation: alternate postures and incorporate short movement breaks to reduce static load on muscles.
Quick checklist to evaluate your current setup
- Is your monitor or book at eye level so you don’t bend your neck?
- Can your feet sit flat on the floor or a footrest?
- Is your lower back supported by the chair when you sit upright?
- Do your forearms rest comfortably on the desk with elbows at about 90 degrees?

Setting Up the Perfect Study Station: Step-by-Step
Transform your desk into a high-performance study station with small, practical changes. Follow this step-by-step routine and tailor it to your body and space.
1. Chair position and support
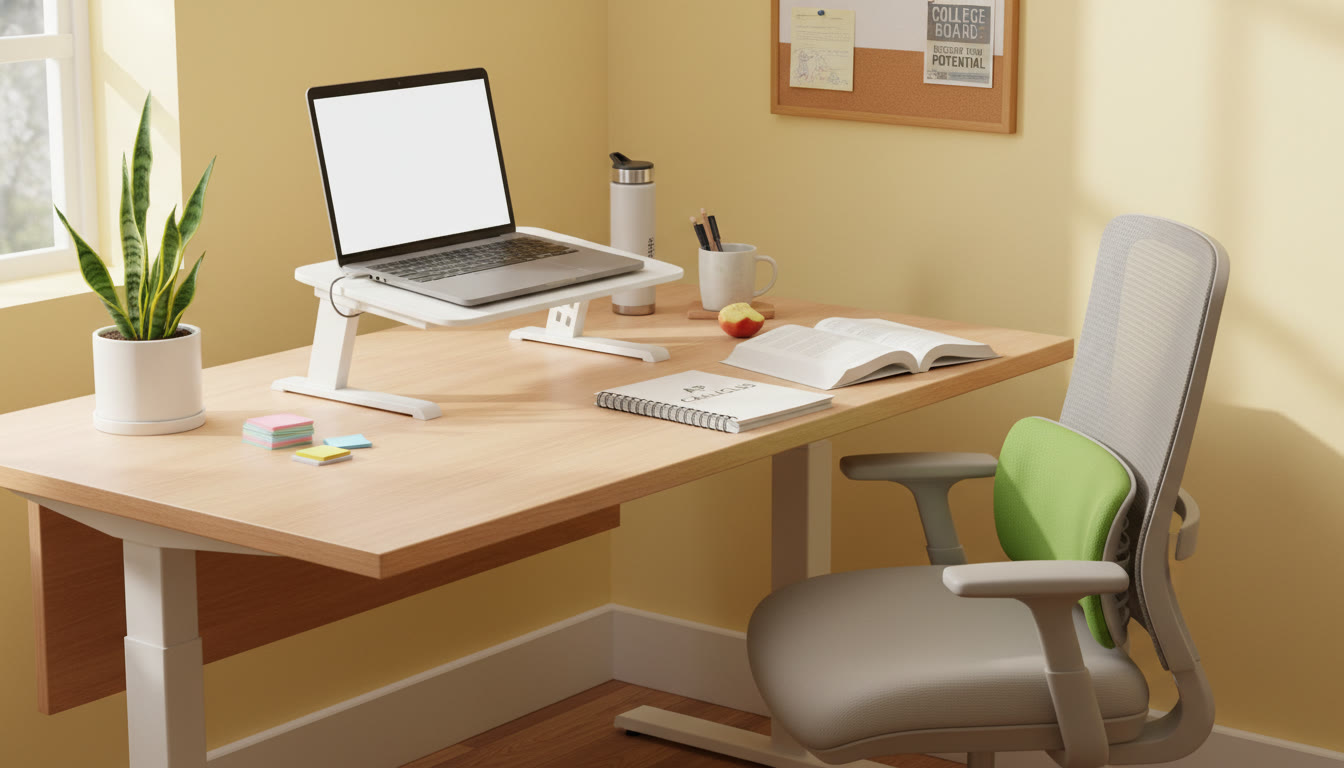
Start with the chair. Sit all the way back so the chair’s lumbar curve supports the natural inward curve of your lower back. If your chair lacks built-in lumbar support, roll a towel or use a small cushion. Adjust seat height so your knees are at about a 90-degree angle and feet rest flat on the floor. If your feet don’t reach the floor, use a stack of books or a footrest.
2. Desk height and arm position
Your forearms should rest on the desk with shoulders relaxed. If the desk is too high, raise your chair and use a footrest. If it’s too low, consider a keyboard tray or bolster the desk with stable blocks. Keep wrists neutral—avoid bending up or down while typing or writing.
3. Screen and materials placement
Position your primary screen or book so the top third of the screen or the top of the pages sits at eye level. Your eyes should look slightly downward at the work, not sharply down. Use a laptop riser or stack of sturdy books and a separate keyboard if you need elevation. Place frequently referenced notes, calculators, and pens within arm’s reach to minimize repetitive stretching.
4. Lighting and glare
Good lighting reduces eye strain and helps you stay alert. Use a desk lamp with adjustable brightness and position it to avoid glare on screens and shadows on paper. Natural light is great—just angle your station so the light comes from the side rather than directly behind or in front of you.
Ergonomics Table: Ideal Measurements and Adjustments
| Body Part | Ideal Position | Practical Adjustment |
|---|---|---|
| Head and neck | Neutral; ears above shoulders | Raise screen height; bring book to eye level |
| Shoulders | Relaxed, not hunched | Adjust chair back and armrests; drop keyboard a bit |
| Lower back | Supported curve | Add lumbar roll or cushion |
| Forearms and wrists | Parallel to desk, neutral wrists | Keyboard at elbow height; use wrist pad if needed |
| Hips and knees | Hips slightly higher than knees; knees at ~90° | Adjust seat height; use footrest if feet don’t reach |
| Eyes | Top of screen at eye level; 20–30 inches away | Use monitor riser; sit slightly back from screen |
Posture Habits That Boost Stamina and Focus
Setting up a great station is one thing; using it well is another. Develop posture habits that support long study blocks without the fatigue.
Micro-breaks every 20–30 minutes
Short breaks—stand, stretch, walk a few steps—reset your posture and blood flow. A 30-second stretch or a sip of water will do wonders for concentration and physical comfort. The classic “20-20-20” rule for eyes (every 20 minutes look 20 feet away for 20 seconds) is especially helpful during long screen sessions.
Switch tasks and posture
Alternate reading from a book, writing notes, and doing practice problems on a tablet or laptop. Changing the type of activity naturally changes your posture and reduces repetitive strain.
Active sitting options
Standing desks or sit-stand converters are excellent for adding variety—aim for a mix of sitting and standing across a long study session. If a standing desk isn’t available, brief standing stretches at natural break points (e.g., after completing a practice FRQ or a set of flashcards) keep muscles engaged.
Stretching and Quick Exercises for Study Breaks
Integrate these 2–3 minute moves into your study routine to counteract stiffness and keep your brain alert. Do them between timed practice sets or every half hour.
- Neck rolls: gentle, slow circles to reduce tension.
- Thoracic twists: sit upright, place hands behind your head, and gently rotate from the torso to each side—helps with mid-back mobility.
- Shoulder rolls: big forward and backward circles to release tight traps.
- Seated figure-four: cross an ankle over the opposite knee and lean forward to open hips (especially useful after long sitting).
- Wrist stretches: extend the arm with palm down and gently pull fingers back with the other hand; repeat palm up.
Breathing for focus
Simple diaphragmatic breathing during breaks lowers stress and sharpens focus. Try four-count inhale, four-count hold, and six-count exhale for 1–2 minutes before returning to work. Your posture will improve naturally when breathing from the diaphragm.
Study Strategies Linked to Ergonomics
Ergonomics and study strategy go hand-in-hand. When your body is comfortable, your mind is free to focus on higher-order tasks—synthesis, problem solving, and exam strategy.
Pair environment with active study methods
Use your ergonomic setup to support active learning techniques: spaced repetition, active recall, and timed practice tests. For example, reserve the standing position for timed practice sections to mimic exam-day alertness, and sit for reading and note synthesis.
Use ergonomics to signal productive modes
Small rituals reinforce concentration. When you sit with correct posture and set a timer, your brain registers that it’s time to engage deeply. Over weeks, these cues become automatic—ideal for consistent AP prep.
Common Problems and Practical Fixes
Here are typical student complaints with quick, realistic solutions you can implement today.
- Stiff neck: raise screen height or tilt book; add a brief neck stretch every 20 minutes.
- Lower back ache: move back into the chair, add lumbar support, and stand for five minutes every 30–45 minutes.
- Wrist soreness: check keyboard and mouse height; use short typing sessions with breaks and wrist stretches.
- Fatigue and zoning out: switch to standing or go for a brisk 2–3 minute walk; hydrate and do a breathing reset.
When to Seek Professional Advice
If pain persists despite practical adjustments—especially sharp or radiating pain, numbness, or pins-and-needles—consult a health professional. A physical therapist can assess biomechanics and recommend targeted exercises. For persistent vision strain, get an eye exam to rule out an uncorrected prescription or binocular vision issues.
Designing a Study Plan Around Body and Mind
Great AP prep blends content mastery with sustainable habits. Build study blocks that align with your body’s rhythm and the demands of the test.
Sample three-hour AP study block
Use this template and adapt to your subject and energy level:
- 0:00–0:50 — Focused study (active reading or problem-solving). Micro-break at 25 minutes for 30 seconds.
- 0:50–1:00 — 10-minute break: stand, stretch, hydrate.
- 1:00–1:50 — Timed practice or practice FRQs. Consider standing for the first 25 minutes.
- 1:50–2:00 — 10-minute break: walk, breathe, light snack.
- 2:00–2:40 — Review mistakes, annotate, summarize key concepts.
- 2:40–3:00 — Wind-down: light review, plan next session, gentle stretching.
How Personalized Tutoring Can Support Ergonomics and Study Efficiency
Academic progress is personal—so are ergonomic needs. Personalized tutoring can align study plans with how you work best physically and mentally. For example, a one-on-one tutor can:
- Help structure study blocks that balance active recall with rest.
- Create tailored practice schedules that avoid burnout and fit your attention span.
- Offer quick strategies to improve workflow—like how to format notes for faster retrieval during review sessions.
Sparkl’s personalized tutoring blends subject expertise with study design: 1-on-1 guidance, tailored study plans, and AI-driven insights to identify weak spots and suggest efficient practice patterns. When content coaching meets ergonomic awareness, study time becomes smarter and more sustainable.
Practical, Low-Cost Tools to Improve Ergonomics
You don’t need expensive gear to create an ergonomic corner. Here are affordable ideas that make a big difference:
- Laptop riser (or a stack of sturdy books)
- External keyboard and mouse
- Small lumbar cushion or rolled towel
- Desk lamp with adjustable arm
- Simple footrest: a box or a small stool
- Sticky notes or a whiteboard to keep tasks visible and reduce reaching for papers

Putting It All Together: A One-Week Habit Plan
Turn ergonomic awareness into lasting practice with a seven-day plan. Focus on one change each day so adjustments are sustainable:
- Day 1: Adjust chair and screen height; commit to sitting all the way back.
- Day 2: Add a lumbar roll and align keyboard height; notice sensations during a one-hour study block.
- Day 3: Introduce the 20-20-20 eye rule and add gentle neck stretches between tasks.
- Day 4: Experiment with a standing segment during a timed practice set.
- Day 5: Set up a short micro-break routine—neck rolls, shoulder rolls, and wrist stretches.
- Day 6: Optimize lighting and declutter your workspace for better focus.
- Day 7: Reflect—note what helped most and create a weekly study schedule that includes posture checks.
Final Thoughts: Comfort Is a Study Skill
Ergonomics is more than comfort; it’s an active part of exam preparation. When you take care of your body, you protect your attention and stamina—the two most important resources for AP success. Small changes add up: better posture leads to fewer distractions, more focused minutes, and higher-quality study time.
Make adjustments gradually, listen to your body, and treat ergonomic practice as part of your study routine—just like review schedules and practice tests. And remember, tailored support—whether through a caring tutor or tools like Sparkl’s personalized tutoring—can accelerate the process by helping you build study plans that work both for your brain and your body.
Quick recap
- Set up your chair, screen, and desk so joints are neutral and supported.
- Take short, frequent breaks and vary posture throughout study sessions.
- Use inexpensive tools to create meaningful improvements.
- Integrate ergonomics into study strategy—your body and mind will thank you.
Now take five: stand up, stretch your shoulders, breathe, and come back ready to study smarter—not harder.


No Comments
Leave a comment Cancel